Monday, April 6, 2020

3 Best Grow Tent Review 2020 – A Buying Guide For PRO Gardner

Starting your own cannabis grow setup can be a challenge, especially if you’re strapped for space and cash. Most beginner growers who don’t have the amount of space that established growers have, and they’re unsure where to start. In fact, many have a small apartment to work with. Under these conditions, there are certain obstacles that you will face, such as where to hang your lights, what to do about odour (cannabis emits strong scents), and how to ensure each bud is getting enough sunlight.

Growing cannabis indoors doesn’t have to be difficult. The plant itself grows just like a weed, so it’s a fast growing process. It’s the setup itself that can take some time. For the best cultivation conditions, the goal is to mimic natural sunlight indoors. The benefit of setting up the perfect grow conditions indoors is that you can grow year round, so you’re not dependant on the season and weather. Luckily, beginners today have the option of buying a grow tent to set up the perfect indoor growing conditions.

What is a Grow Tent?
At their most basic, grow tents are fabric that is wrapped around a frame made of metal poles. The fabric is coated with a reflective material on the inside, so as much light as possible is used by your plants.

Marijuana Grow tents differ from grow boxes in that they’re versatile and easy to transport, while grow boxes are often heavy, but less fragile. These days, almost everyone but serious commercial hydroponic growers use grow tents instead of custom grow boxes or grow rooms.

Why You Should Use a Grow Tent?
Maximize Your Cannabis Grow Lights – A grow tent will typically has reflective walls which are better than what you can do yourself.

Designed for Common Grow Equipment – It is fairly easy to adjust and hang grow lights, find ports and vents, hook up your fan. A grow tent accounts for most of the growing situations creating the ideal environment for plants to thrive.

Light Proof – A grow tent is made in such a way that light does not leak in and out of the tent. This not helps with faster growth bit as prevents light from spilling out. DIY light proofing can be cumbersome and a grow tent eliminates that problem.

Vivosun Mylar Hydroponic 36”x36”x72” Grow Tent

VIVOSUN Indoor Grow Tent

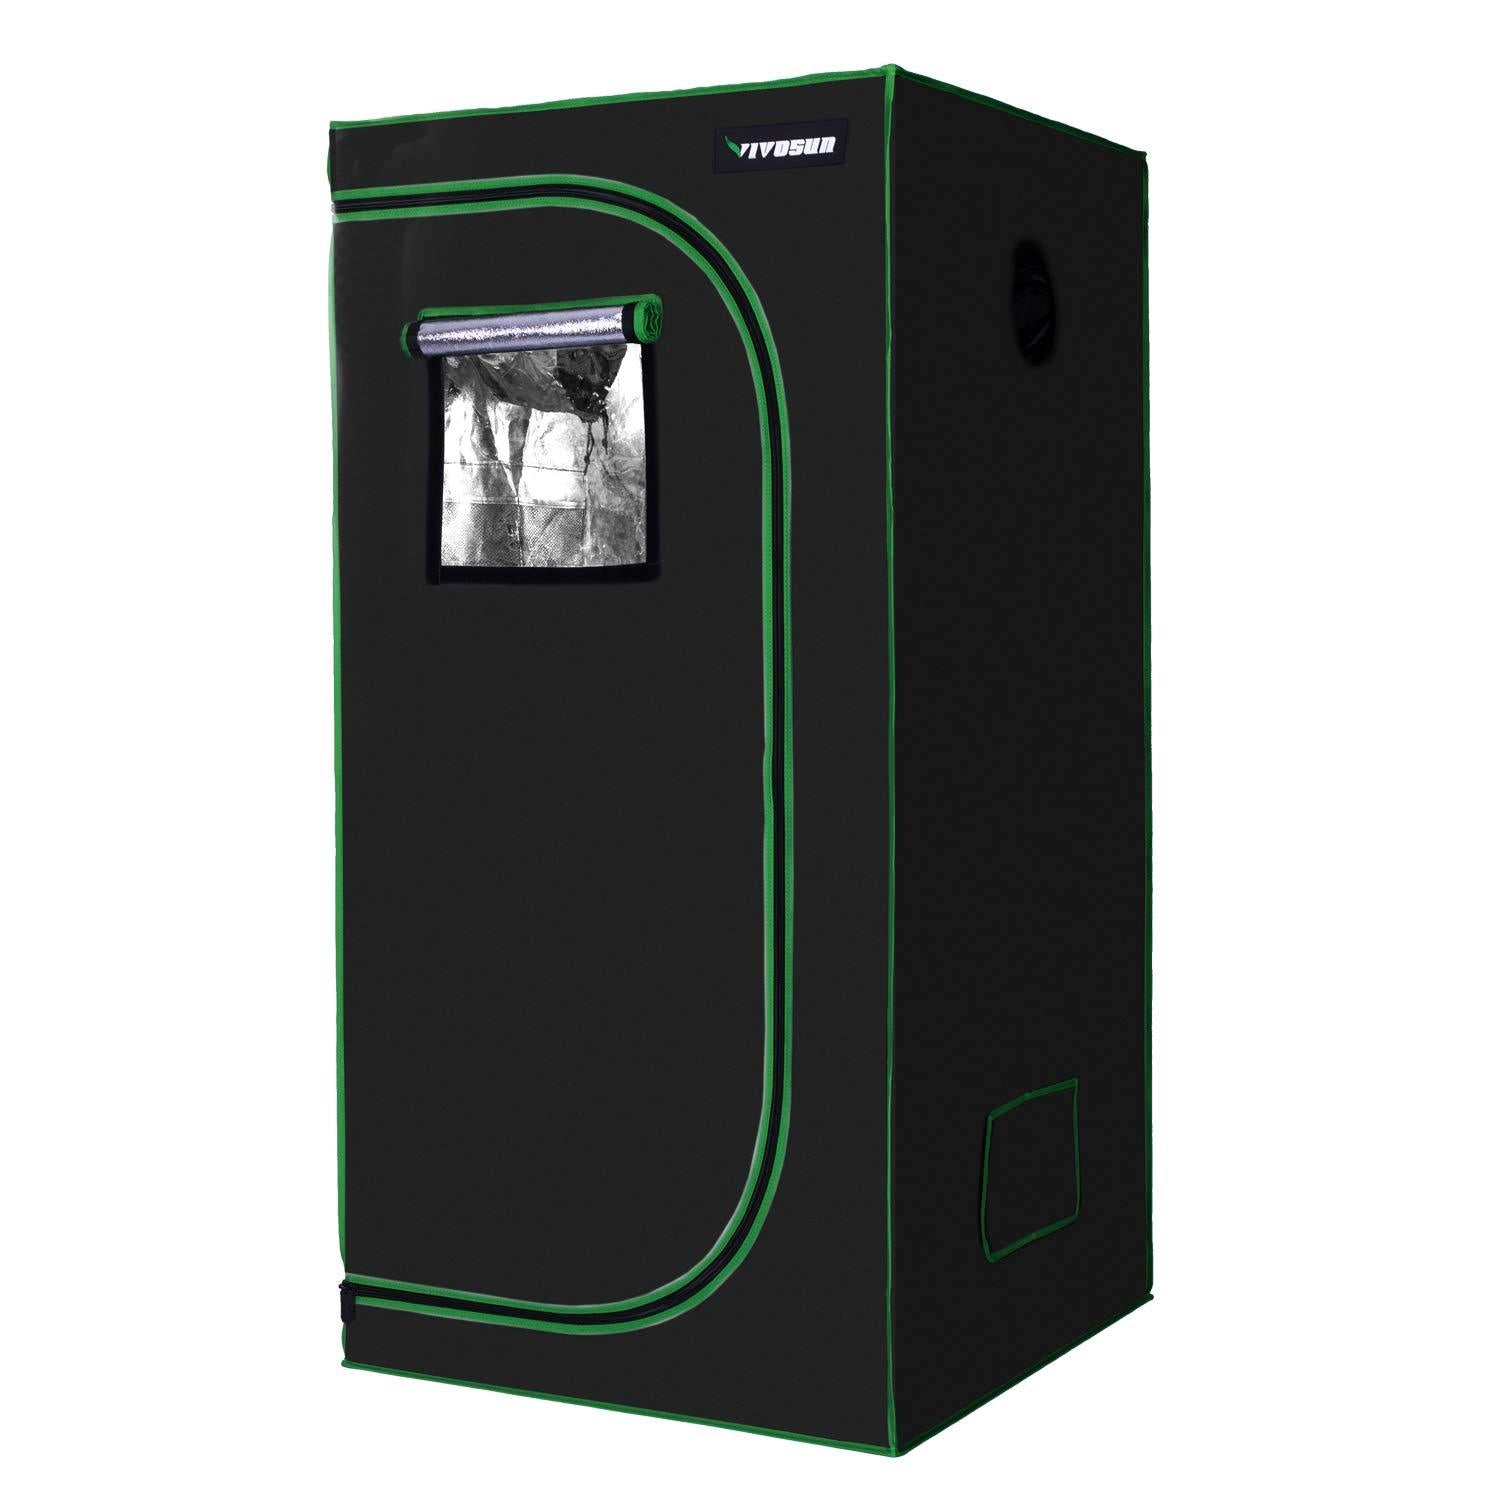
Vivosun is a well-reputed company in the market, and as such the 3×3 grow tent has spectacular quality. The fabric density is 600D thus entirely light and waterproof.

95 % of the interior is constructed out of reflective material, thus it reflects about all light within the grow-tent thus improving the effectiveness of your grow lights. The tents are long-lasting due to frame that has metal poles and connectors.

The door of the tent has a smooth zipper, it has windows that let you observe the plants without moving the environment. No tools are needed to assemble the tent. It also comes with a 2-year warranty and weighs 22lbs.

Apollo Horticulture 48”x24”x60” Grow Tent

Apollo Horticulture 48”x24”x60” Mylar Hydroponic Grow Tent for Indoor Plant Growing

This Apollo Horticulture grow tent does not seem to disappoint in any aspect. This 3×3 grow tent delivers a great cover over your plants. You can be confident they will blossom.

We have yet another Apollo horticulture tent. This tent is similar to the one above in all aspects except the size. This tent is a bit smaller than the one above.

Features

  • The tent measures 48*24*60 inches
  • It has reflective interior
  • It is 100% lightproof

Eco Farm 2*2FT(24*24inch) Grow Tent

Eco Farm 2*2FT(24*24inch) Grow Tents - Standard Style

Another grow tent that is inexpensive and is a great value for money, the ECO Farm D-Door grow tent has a sturdy tubular metal frame.

The tubular metal frame with metal push lock corners calls for easy tool free assembly. The poles have a diameter of 6mm. The metal frame comes with three additional heavy duty support bars and four metal rings to hang lights and other equipments.

The outer oxford canvas material has a thickness of 600D and has an inner reflecting mylar lining which has a 95% reflectivity. This may be matter of concern to some who are accustomed to a 100% reflective inner lining. It has a large D-shaped door with an attached hook that holds the door open while you work. USE CODE SALE25 to get EXTRA 25% OFF now!

The Conclusion
Consider all the critical factors before you get yourself into the actual purchasing step. Do your research to avoid any inconvenience. Know your priorities and get going with your gardening skills. We hope that our guide help you make the right purchase that meet your needs without breaking the bank.

Thursday, April 2, 2020

Homemade Fertilizer for Weed & Cannabis Plants

Are you fond of gardening but fear that it might cost you more? Well, you can grow weed or other plants which will cost you less or no money. Back in the days, people used to make a homemade fertilizer, which not only costs less but provides better results as well.

Fertilizers are essential in the growth of plants. They supplement the nutrients which are naturally present in the soil and make plants healthy. Throughout the growth cycle, fertilizers help plants develop high yield.

If you think that making homemade fertilizer for weed is difficult, you are probably wrong! The process is pretty straightforward. You need to get some ingredients to make fertilizer at home, some of them will be present in your kitchen as well.

Commercial Fertilizer vs. Homemade Fertilizer
There are pros and cons to both options. Commercial fertilizer use special mixes to feed plants. They can be very precise and easy to use. And because of that precision, they tend to produce impressive results.

But there are also downsides. Many smokers say that using chemical fertilizer produces buds that aren’t as clean, good-smelling, or tasty as organic ones. And there could be some health concerns as well. Some chemical marijuana fertilizers and pesticides may contaminate buds with stuff you might not want in your body.

Going with homemade cannabis fertilizer can be a great option. That’s because you can make your own organic plant food that doesn’t use any dangerous chemicals. And many smokers prefer buds from plants that have been fed natural fertilizers. These buds tend to taste and smell better.

UNDERSTANDING MARIJUANA NUTRIENTS
When making marijuana fertilizer, it’s important to understand the basic nutrient needs of marijuana plants.

There are three main nutrients for marijuana plants. These are nitrogen (N), phosphorous (P), and potassium (K). Nitrogen is very important for plants. This nutrient helps with the photosynthesis process. Most plants cannot absorb nitrogen from the air. As such, it needs to be added to the soil or growing medium. During the vegetative stage, marijuana plants need high levels of nitrogen.

Coffee grounds
Fertilizer for the growth phase

The use of coffee grounds as a natural fertilizer has long been well known, and it is also one of the most commonly used homemade fertilizers for marijuana.

The coffee grounds are acidic and promote the development of acetic bacteria in the substrate, containing about 2% nitrogen and other organic nutrients.

A good way to prepare a good marijuana fertilizer is to add the coffee grounds to your compost bin or composter, or spread them and mix them with the substrate that will be in contact with the roots of your plant, but you should control the pH well as they can leave the substrate too acidic.

Banana peel tea
Potassium is considered, after nitrogen, one of the essential nutrients for plants, which is involved in the process of photosynthesis, in osmo-regulation of water on the ground and the formation of drought and frost-resistant fabrics. When there is deficiency of potassium in plants we observed a yellowish color and marginal burns in the leaves, slow growth, reduction in bloom or progressive loss of leaves. To provide an extra potassium to our plants we can boil 3-4 bananas with sugar shells and use once diluted, and cold water, to water the plants.

Human urine
One of the strangest fertilizers you may have ever heard of is human urine. Indeed, the yellow stuff is chock-full of the nitrogen that can promote stem and leaf production. It is important to not urinate directly on the marijuana plants or even near the plants because it might kill where it touches. This is because the urine has too high of a concentration of nitrogen for it to be safe. That is why it must always be diluted in about a gallon of water and then used quickly. If it’s not used soon after the solution is made, then you run the risk of ammonia-forming which could infect and kill the plant.

Growing marijuana indoors has many advantages over growing marijuana outdoors. In a marijuana grow tent you are in control of the environmental conditions from temperature to light to humidity to CO2 levels. You can adjust ambient conditions to suit a particular strain or stage of growth. Plus, your cannabis crop is much safer from theft or discovery by the authorities if you are growing illicitly.

The more light you have the bigger your yield is going to be. A sunny window with 4 hours of direct sun will grow a couple baggies. With full sun all day, you will send your yields through the roof. But having too much pot has never been a problem.  If you live in a house that gets very little direct sunlight, you can always supplement with a natural spectrum COB LED grow light. These cannabis grow lights are affordable to buy, have low energy costs, and emit a natural spectrum of light that can proudly sit over your cannabis plant in the corner of your living room.

The size of your Cannabis plant will correlate directly to the size of its root system. This means that the more space your plant has to expand its roots, the more easily it will grow. If the Cannabis plant ends up being too large for the pot, you will run into issues with nutrient and water absorption. Your plant will have a minimized efficiency, and the soil will likely burn through water quickly.

In general, if you have an average Cannabis cutting or seedling, a grow pot with dimensions of roughly 10x10x10 cm will be large enough for you.

Wednesday, April 1, 2020

Stages In The Life Cycle Of The Marijuana Plant

Growing weed successfully requires you to learn about the various stages of its lifecycle along with the requirements of the plant in each phase.

Marijuana plants have different growth stages. If you are thinking of growing a cannabis plant, it is crucial that you are aware of these stages. You need to learn more about the life cycle of the plant. This is vital since the requirements of the plant vary with each stage of the life cycle. How much light, nutrients, and water the plant needs depends on the stage of growth that it is in.

Stage 1 – Germination
This is where it all begins – where your tiny seed will swell and burst in the presence of warmth and water, until its hard, tough casing finally cracks.

During this step to growing cannabis, your seedlings need only water and warmth to grow.

They don’t even need light, and may actually suffer stress if exposed to too much light.

So it’s perfectly fine to keep them in a dark cupboard or similar for the first couple of days – just make sure that they are kept warm and sufficiently moist!

Stage 2 – Seedling
Small cuttings are taken from the mother plants and planted into a moist starter cube in a low light and high humidity environment.

After two weeks, the roots start to sprout through the starter cube and the seedling is transplanted to a larger cube. After an additional two weeks of growth, the young cannabis plant is moved to a slightly larger base.

Stage 3 – Vegetation
A cannabis plant will start to grow outdoors in early spring, anything from mid March to late may, depending on local environmental conditions. During the spring time and early summer, the plant will grow leaves, stems and branches. It will also spend a lot of energy building a good root base. This is known as vegetation.

If you’re growing indoors bt using marijuana grow tent and cannabis grow light, it won’t be long before you will need to transplant into a bigger grow pot, and begin some training, and topping.

Early veg will only last a couple of weeks, as soon as a good root structure is formed, the plant is stable and very resilient. The growth rate will increase and with in four to five weeks after germination, your will be into late veg.

Stage 4 –  Flowering Phase
Within its second to the third month of life, the cannabis plant will reach pre-flowering and flowering periods. 

The pre-flowering period is important as it will show you early on if your plants turned out male or female. Male plants will have sack-like structures where the leaves and main stem is connected.  You will need to weed these out as you see them as the pollen that is released when they mature and burst will decrease the potency of cannabinoids in the female plants. The distinct “hairs” that are generally associated with strong weed are a result of female plants that have escaped pollination (which is where the term sinsemilla comes from).

Stage 5 –  Harvest
The flowering stage has a different duration for each strain and seed, meaning the best time to harvest is going to be different. Typically, 7-8 weeks is enough for flowering. If you harvest too late, you risk losing potency. The same can be said of harvesting too early. For this reason, you must pay close attention towards the end of the flowering stage to know the perfect time to harvest those buds.

The little hairs on the buds will start to change colour when it’s time to harvest. Where they would have been white and milky throughout the flowering stage, they will change to an orange or amber colour.

Even the trichome heads change colour when it’s ready for harvest, meaning they will be opaque rather than clear. In the extremely late stages of flowering, these trichomes will also turn amber. However, to see these you probably need to use a magnifying glass.

Indoor Cycle
We get a short life cycle when we grow indoors which usually takes around 3 months. For clones, it’s even shorter at 2 to 2.5 months. However, some strains take up to 7 to 15 weeks to flower.

One big advantage in indoor gardening is that we can control most of the stages. For example, we can hasten the vegetation phase by planting more plants per square foot. Also, we can choose the time to trigger the flowering stage once the plants reach our desired size.

When it’s time for the cannabis to flower, we can put them in the 12- hour light cycle. Sometimes, other factors in the cannabis grow tent will trigger the flowering but not by more than 5 days.